Navigation
Dashboard Features
Enflux uses Grafana on the backend. Please refer to the following Grafana usage example:

(1) Home Page: Click Home in the breadcrumb to be redirected to the home page.
(2) Dashboard title: When you click the dashboard title, you can search for dashboards contained in the current folder.
(3) Share dashboard or panel: Use this option to share the current dashboard or panel using a link or snapshot. You can also export the dashboard definition from the share modal.
(4) Add: Use this option to add a panel, dashboard row, or library panel to the current dashboard.
(5) Save dashboard: Click to save changes to your dashboard.
(6) Dashboard insights: Click to view analytics about your dashboard including information about users, activity, query counts. Learn more about dashboard analytics.
(7) Dashboard settings: Use this option to change dashboard name, folder, and tags and manage variables and annotation queries. Learn more about dashboard settings.
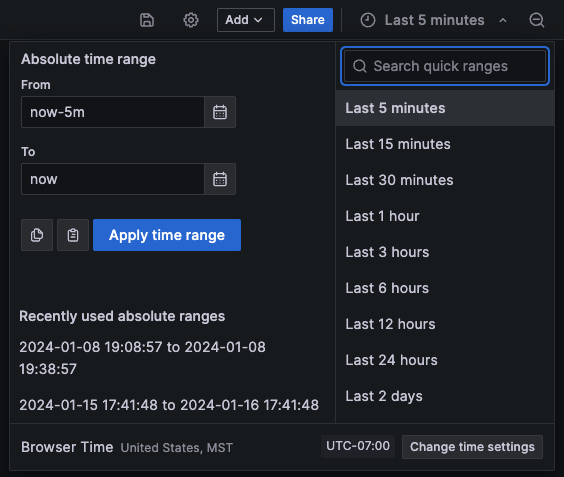
(8) Time picker dropdown: Click to select relative time range options and set custom absolute time ranges.
You can change the Timezone and fiscal year settings from the time range controls by clicking the Change time settings button.
Time settings are saved on a per-dashboard basis.
(9) Zoom out time range: Click to zoom out the time range.
(10) Refresh dashboard: Click to immediately trigger queries and refresh dashboard data.
(11) Refresh dashboard time interval: Click to select a dashboard auto refresh time interval.
(12) View mode: Click to display the dashboard on a large screen such as a TV or a kiosk. View mode hides irrelevant information such as navigation menus.
(13) Dashboard panel: The primary building block of a dashboard is the panel. To add a new panel, dashboard row, or library panel, click Add panel.
Library panels can be shared among many dashboards.
To move a panel, drag the panel header to another location.
To resize a panel, click and drag the lower right corner of the panel.
(14) Graph legend: Change series colors, y-axis and series visibility directly from the legend.
(15) Dashboard row: A dashboard row is a logical divider within a dashboard that groups panels together.
Rows can be collapsed or expanded allowing you to hide parts of the dashboard.
Panels inside a collapsed row do not issue queries.
Use repeating rows to dynamically create rows based on a template variable.
Time Ranges
The dashboard provides several ways to manage the time ranges of the data being visualized, for dashboard, panels and also for alerting.
This section describes supported time units and relative ranges, the common time controls, dashboard-wide time settings, and panel-specific time settings.
Time units and relative ranges
Grafana supports the following time units: s (seconds), m (minutes), h (hours), d (days), w (weeks), M (months), Q (quarters) and y (years).
The minus operator enables you to step back in time, relative to the current date and time, or now. If you want to display the full period of the unit (day, week, month, etc…), append /<time unit> to the end. To view fiscal periods, use fQ (fiscal quarter) and fy (fiscal year) time units.
The plus operator enables you to step forward in time, relative to now. For example, you can use this feature to look at predicted data in the future.
The following table provides example relative ranges:
Expand table
Last 5 minutes
now-5m
now
The day so far
now/d
now
This week
now/w
now/w
This week so far
now/w
now
This month
now/M
now/M
This month so far
now/M
now
Previous Month
now-1M/M
now-1M/M
This year so far
now/Y
now
This Year
now/Y
now/Y
Previous fiscal year
now-1y/fy
now-1y/fy
Common time range controls
The dashboard and panel time controls have a common UI.

The following sections define common time range controls.
Current time range
The current time range, also called the time picker, shows the time range currently displayed in the dashboard or panel you are viewing.
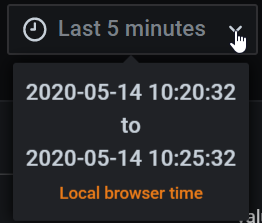
Hover your cursor over the field to see the exact time stamps in the range and their source (such as the local browser).

Click the current time range to change it. You can change the current time using a relative time range, such as the last 15 minutes, or an absolute time range, such as 2020-05-14 00:00:00 to 2020-05-15 23:59:59.

Relative time range
Select the relative time range from the Relative time ranges list. You can filter the list using the input field at the top. Some examples of time ranges include:
Last 30 minutes
Last 12 hours
Last 7 days
Last 2 years
Yesterday
Day before yesterday
This day last week
Today so far
This week so far
This month so far
Absolute time range
You can set an absolute time range in the following ways:
Type values into the From and To fields. You can type exact time values or relative values, such as
now-24h, and then click Apply time range.Click in the From or To field. Grafana displays a calendar. Click the day or days you want to use as the current time range and then click Apply time range.
This section also displays recently used absolute ranges.
Semi-relative time range
You can also use the absolute time range settings to set a semi-relative time range. Semi-relative time range dashboards are useful when you need to monitor the progress of something over time, but you also want to see the entire history from a starting point.
Set a semi-relative time range by setting the start time to an absolute timestamp and the end time to a “now” that is relative to the current time. For example:
Start time: 2023-05-01 00:00:00
End time: now
If you wanted to track the progress of something during business hours, you could set a time range that covers the current day, but starting at 8am, like so:
Start time: now/d+8h
End time: now
This is equivalent to the Today so far time range preset, but it starts at 8:00am instead of 12:00am by appending +8h to the periodic start time.
Using a semi-relative time range, as time progresses, your dashboard will automatically and progressively zoom out to show more history and fewer details. At the same rate, as high data resolution decreases, historical trends over the entire time period will become more clear.
Copy and paste time range
You can copy and paste the time range from a dashboard to Explore and vice versa, or from one dashboard to another. Click the Copy time range to clipboard icon to copy the current time range to the clipboard. Then paste the time range into Explore or another dashboard.

Market Making Filters
On the top of the Dashboard you have multiple filtering options depending on the Dashboard type:
Trading Pair - Trading Pair (Market) of Interest
Exchange - CEX or DEX exchange
Candlestick Timeframe - The number of minutes/hours to aggregate the Candlestick Chart with.
Data Aggregation Window - The number of minutes/hours to aggregate other charts with.
Account ID - This is used to switch between multiple accounts and/or trading bots on the same Trading Pair - Exchange pairs.
Increase and decrease the Data Aggregation Window as you increase and decrease the time frame specified. As data from a larger time frame is selected, increasing the Data Aggregation Window would remove data noise and represent information in a more understandable manner.

Refresh
Clicking on the Refresh button would update all Dashboard panels with the newest available data.


For further instructions, please check https://grafana.com/docs/grafana/latest/dashboards/use-dashboards/ .
Last updated